Non-invasive symphyseal fracture management offers excellent alternative to traditional approaches
Symphyseal fracture repair in cats has been performed traditionally by placing a ligature wire circumferentially around the anterior mandible and securing the right and left mandibular bodies by tightening the ligature wire. This method is not only invasive, but often results in an unstable symphyseal reduction because of the faculty of ligature wire to stretch over time.
Symphyseal fracture repair in cats has been performed traditionally by placing a ligature wire circumferentially around the anterior mandible and securing the right and left mandibular bodies by tightening the ligature wire. This method is not only invasive, but often results in an unstable symphyseal reduction because of the faculty of ligature wire to stretch over time.

Pharyngealtracheal intubation allows a surgeon to access the occlusion as repair is being performed.
In contrast, a non-invasive procedure presented in this article employs the use of a chemically-cured dental composite, which is less traumatic, easier to perform and results in a stable symphysis.
Anesthesia protocol
Anesthesia for this procedure can be accomplished using gas anesthesia or injectable anesthesia. The preferred method would be with conventional induction, intubation and gas anesthesia for maintenance. This allows the practitioner to maintain an airway and proper ventilation in an already traumatized and therefore compromised patient.
In order to be able to evaluate proper occlusion later in the procedure, pharyngealtracheal intubation with a retropharyngeal exit for the endotracheal tube can be employed or the use of a shortened and very firmly secured endotracheal tube can be used. With this method, for very short periods of time, the adapter is removed and the endotracheal tube is pushed back into the mouth in order to evaluate the occlusion.
The second anesthetic protocol that can be employed is one using injectable anesthesia. Though easier for occlusion evaluation, because of lack of proper airway and ventilation maintenance, this is not the preferred method of anesthesia.
Note: Regardless of the type of anesthesia used, all procedures should incorporate the use of local anesthesia. Lidocaine or bupivicaine, at no more than a total of 2 mg/kg, can be injected into the mucobuccal fold in the symphyseal area.
Materials
There are several chemically cured dental composites available on the market that will work equally well for this fracture repair. This procedure details the use of Pro Temp Garant by Espee ™ (Photo 1). Dental composites are packaged in two-part canisters with one side containing the base and the other the catalyst. When mixed by the plunger action of the Garant, the base and catalyst are combined in the nozzle and deliver a thick, flowable material that hardens in two to three minutes.

Photo 1: Fracture repair composite applicator.
Procedure
Step 1: If present, soft-tissue lesions are cleaned, debrided and sutured. A local anesthetic block is injected into the mucobuccal fold in the symphyseal area (Photos 2-3).

Photo 2: Soft-tissue lesions should be cleaned before a local anesthetic is applied.

Photo 3: Local block is applied.
Step 2: The lower canines are ligated together into proper alignment using a 26-gauge ligature or a 3-0 suture wire in a figure-eight pattern. If necessary, a shallow groove can be made with a dental bur on the buccal aspect of each canine to help keep the wire in place (Photos 4-5).
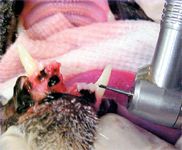
Photo 4: A shallow groove made with a dental bur.
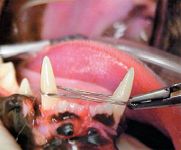
Photo 5: A groove holds the wire.
Step 3: The dental composite is injected around the base of the canines and over the ligature wire (Photo 6).

Photo 6: Dental composite injected.
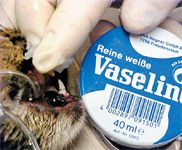
Photo 7: Coat upper incisors and canines.
Step 4: The upper incisors and canines are coated with petroleum jelly, and the mouth is closed into proper occlusion. By using the proper occlusion, the mandible is then correctly and functionally aligned. The composite will set in two to three minutes (Photos 7-8).

Photo 8: Mandible correctly and functionally aligned.
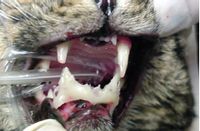
Photo 9: Open mouth after composite sets to minimize tissue trauma.
Step 5: The mouth is then opened and to minimize tissue trauma, the rough edges of the composite are smoothed with a diamond dental bur in a high-or low-speed hand piece. It is important to note where the upper incisors and canines come into contact with the dental composite. Any areas of the composite that interfere with the occlusion should be relieved using a dental bur (Photos 9, 10). Note: For veterinary hospitals without dental equipment, a rotary power tool and stone filing burs can be used for this entire procedure.
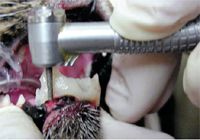
Photo 10: Areas of composite that interfere with the occlusion should be relieved using a dental bur.
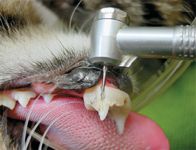
Photo 11: Composite is cut after four to five weeks.
Step 6: The composite is removed in four to five weeks. Removal is easily accomplished by cutting the composite and wire with a small cutting bur, taking care not to cut through the composite and into the teeth. The mouth is closed into occlusion to verify alignment and symphyseal stability (Photos 11-12).
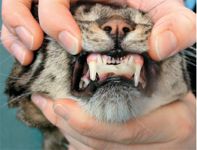
Photo 12: Verify alignment and symphyseal stability.
Dr. Emily is a world-renowned lecturer and author in veterinary dentistry. He is the co-author of Small Animal Dentistry and board certified from the American Veterinary Dental College. Dr. Emily serves as faculty affiliate with Colorado State University.