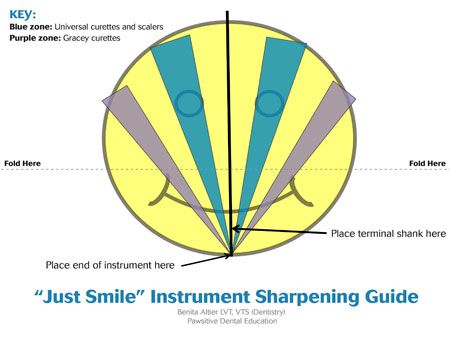
Just Smile: A veterinary dental instrument sharpening guide
Sharp curettes and scalers are better for your team and your patients. Follow this step-by-step guide for getting your dental instruments in sharp shape.
When it comes to dental instruments, sharpness matters. A dull instrument may not be able to effectively remove bacteria-laden debris from the surface of a crown or root. Dullness can also negatively affect speed and efficacy, meaning the patient is under anesthesia longer and the technician has to use more force.
Fine-tipped instruments like curettes and scalers should undergo gentle sharpening before every use, and it's never a good idea to let an instrument become very dull and then try to sharpen it again. Daily sharpening will save you time in the long run.
I created the “Just Smile” guide to help veterinary professionals sharpen dental curettes and scalers efficiently and accurately using the stationary instrument/moving stone method. Here's how to use it in your clinic:

Click on the image to download a printable guide.
Print out and laminate the guide to preserve it for repeated usage.
Fold the laminated guide along the dashed fold line. (The blank side of the page should be on the inside of the fold.) Place it on the counter so that the folded bottom of the guide hangs over the edge of the countertop.
You will need a flat piece of fine-grit Arkansas stone that is freshly oiled. You will also need an oiled conical piece of Arkansas stone ready to go nearby.
Pick up the instrument to be sharpened, and hold its handle with your nondominant hand.
Place the terminal or distal shank of the instrument's working end to be sharpened on the bold black vertical line of the guide with the instrument's handle firmly placed on the fold line at the edge of the countertop. Stabilize the working end of the instrument so that the back of the curette or the third edge of the scaler is at the convergence of colors near the bottom of the smiley face.
(Note: The handle of the instrument will most likely NOT be on the bold black line in the center of the guide. It will likely angle to one side or the other. The handle of the instrument does NOT have anything to do with the color zones. These are for the movement of the stone only.)
Once the instrument is lined up correctly on the guide (with the toe or tip of the instrument facing directly perpendicular to the guide), pick up the flat, oiled Arkansas stone and hold it with your dominant hand. The oiled face of the stone should be angled toward the side of the working end of the universal curette or scaler in the blue zone. Or if you are sharpening a Gracey curette, identify which edge of the working end of the curette is to be sharpened and place the stone in the purple zone on that side only.
Keep the stone in contact with the edge to be sharpened and move it up and down within either the blue zone for universal curettes or scalers or the purple zone for Gracey curettes. Keep the handle of the instrument in a stable position and the terminal shank at a 90-degree orientation on the bold black line in the center of the sharpening guide.
End the sharpening motion on a down stroke.
(Note: Daily sharpening of curettes and scalers should only take three to five strokes of up-and-down motion on the instrument's working edges to maintain sharpness. Dull instruments will take more strokes and more pressure.)
If you are sharpening any kind of curette the next step is required. If you are sharpening a dental scaler, go on to step 10.
Curettes have a rounded toe that must be maintained, but you won't need the “Just Smile” guide for this part. Hold the instrument's handle firmly and orient the toe of the instrument toward your right or left side so you can see it. Then place the oiled, flat Arkansas stone on the toe at a 45-degree angle. Repeat the up-and-down motion around the entire toe from one side to the other. End the toe's sharpening on a down motion.
Pick up the conical stone and remove the instrument from the guide. Roll the conical stone over the face of the curette or scaler a couple of times to remove any metal filings or debris and to create a very “crisp” edge.
Test the instrument for sharpness on a plastic conical test rod. The instrument should “bite” into the plastic and create a pinging sound. Don't shave plastic off of the test rod, as that will dull your freshly sharpened instrument.