Laminitis treatment: A practical approach
One practitioner's 13-step protocol to help horses suffering from this painful condition.
For equine practitioners, treating laminitis may seem like an unrewarding task that can leave patients unimproved (or worse) and clients overwhelmed. So many treatment modalities, drugs and over-the-counter supplements are available that it becomes frustrating just to develop a plan based on solid science.
If there are any pearls of wisdom I can give, they would be the following:
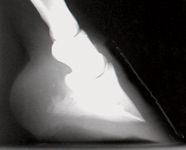
Photo 1: A grade I laminitic event associated with radiographic findings of mild rotation, good sole depth and fairly normal horn-lamellar zone. (Photos courtesy of Dr. Floyd)
• Develop a protocol, and stick to it every time you treat a case of laminitis. Many changes can indicate the severity of as well as signal either improvement in or progression of the disease, and you must learn to identify these signs. Consequently, consistency in your approach to diagnosing and treating laminitis is critical.
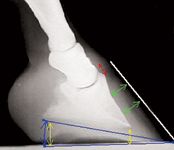
Photo 2: A grade II laminitic event associated with radiographic findings of increased rotation, less sole depth and expanded horn-lamellar zone.
• If your protocol doesn't work, send the patient to a specialty hospital.
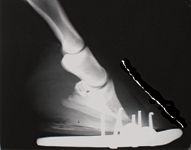
Photo 3: A grade III laminitic event associated with radiographic findings of increased rotation (greater than 10 degrees), decreased sole depth and horn-lamellar zone with increased edema and distortion.
In my early days of practice, each time I got a call about a suspected laminitis case, I felt like I was doomed to failure because there were no tried-and-true therapies. We had some ideas about which medications to administer, but these only relieved the pain—they didn't treat the disease process. The horse was lame and was going to get better or not; it was that simple. After being in practice some time, I began using the following protocol, which allowed me to approach these cases with confidence and know whether I was dealing with a Grade I, II, III or IV laminitic event (Photos 1-4).
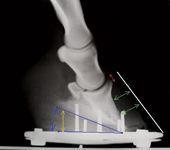
Photo 4: A grade IV laminitic event with radiographic findings that show evidence of solar prolapse, horn-lamellar zone edema and rotation greater than 15 degrees.
Laminitis protocol
1. Look at the horse's physical condition, and determine its body score. Does the animal appear to be in pain? Measure its heart rate, and check the horse's conjunctiva for the degree of hyperemia, which indicates pain and blood pressure. Check the digital pulses—are they bounding? Try to turn the horse, and note the degree of difficulty (assuming the horse is standing and able to move).
2. Administer a nonsteroidal anti-inflammatory drug (NSAID). For example, I administer 2 g of phenylbutazone intravenously.
3. Obtain dorsopalmar and true lateral soft tissue radiographs of the feet.
4. Start determining your differential diagnoses. Why did the horse develop laminitis? You'll need to figure this out to prevent a relapse.
5. Place heel wedge cuffs using sole putty from the tip of the frog and then back to the heels (I use Dallmer [Dallmer GmbH & Co. KG] or Dalric [Nanric Co] cuffs; see "Heel wedge cuff recommendations"). Leave the solar area in front of the frog free of putty to avoid sole pressure over the distal margin of P3. Tape on with 3-in elastic adhesive wrap. Avoid taping over the soft tissue of the bulbs or the coronary band. To help the horse pick up its foot, block the foot or prompt the animal to step forward. Then catch the foot, and slip the cuff on. If the horse is lying down, put the cuffs on then. One of the key benefits to these cuffs is that they can be slipped on quickly, which is important as these horses do not like to elevate their feed for long. If the horse has regular shoes on, use a larger cuff. As this is an emergency, you can get the shoes off later.
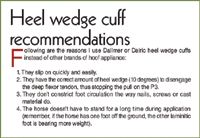
Heel wedge cuff recommendations
6. Once the wedge cuffs are secure, reassess the horse's comfort level by prompting movement. If the horse is down, you will need to get it standing to evaluate it with the heel wedge cuffs on.
7. Dispense oral NSAIDs. I typically use a gastric protectant concurrently.
8. Order complete stall rest for one week.
9. Be sure to obtain lateral and dorsopalmar radiographs weekly to monitor for changes.
10. After the week of stall rest, reassess the horse's comfort level. Is it moving normally? Remove one wedge and look at the foot. Is the horse still as comfortable without the wedge? If so, leave it with only one wedge for another week. (This means it's likely a simple Grade I event.) If the horse is not comfortable with one wedge, put the other one back on because the animal has a higher grade of laminitis.
11. After another week, ideally, the horse will be walking and behaving normally. Take the entire cuff off, and walk the horse. Does the animal appear comfortable? If so, congratulations! You've stopped the disease process at a Grade I level. Suggest to the owner that radiographs be taken again in six weeks. (Most of the damage will be apparent at six weeks, allowing you to set up a trimming plan.) If the horse seems uncomfortable without the wedge, put the cuff back on, and try again in another week. (The horse likely has a Grade II laminitic event.) Keep returning at one-week intervals, and try to remove the wedges. Once the horse appears comfortable, you can leave the wedges off and start light hand-walking.
12. If at any time during the stall rest period the horse starts to develop increased pain, coronary band rupture or solar prolapse (Photo 5), then it's a Grade III or Grade IV case and the horse needs to be referred. If the client can't afford this or if the horse cannot be transported, consult a specialist who can guide you through the necessary procedures and recommend a treatment plan. In this digital age, radiographs and photographs can be sent instantly. But think carefully about trying to treat higher-grade laminitic events yourself, as they take a lot of time, experience and patience. Horses with Grade III or IV laminitis are almost always surgical patients and need continual monitoring if they're going to recover and grow healthy hoof capsules.
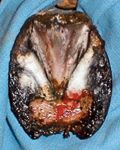
Photo 5: A solar prolapse from a Grade IV laminitis case.
13. Note: Once you've applied cuffs, don't remove them, or you'll engage the deep flexor tendon. If the horse pulls off the wedge cuffs, replace them as soon as possible. Make sure the horse is in a deeply bedded stall, and ensure that the owner knows how to properly apply the cuffs should the need arise.
Follow-up
Once you've determined the grade of laminitic insult, you're now ready to read and evaluate the weekly radiographs to be sure the feet are repairing themselves. The sole depth under the distal margin of the P3 should grow 1 mm a week. If this isn't happening, it should raise a red flag that the laminitis grade may worsen. The horn-lamellar zone should start to look normal as it grows down from the coronary band. The measurement from the wings of P3 to the bulbar tissue should remain constant. If this measurement becomes less (e.g., 40 mm instead of the original 45 mm), you may have a case of fatal sinker syndrome in which the digital column starts as a rotational laminitic case and then drops distally and in a palmar-plantar fashion. These changes require immediate attention.
Another important point: Many laminitic horses start out with negative palmar angle syndrome (NPAS). Historical radiographs taken every year as part of the animal's wellness program will give you a leg up on knowing how bad the laminitic insult is. Many NPAS horses in excruciating pain will appear to have a normal palmar angle, but in reality P3 has rotated radically to that position.1
Andrea E. Floyd, DVM, has specialized in equine podiatry for more than 25 years. She is the owner of Serenity Equine, Evington, Va., and the author of Equine Podiatry. Dr. Floyd is a member of the American Veterinary Medical Association, American Association of Equine Practitioners and the American Farriers Association.
REFERENCE
1. Floyd AE, Mansmann RA. Equine podiatry. St. Louis, Mo: Saunders-Elsevier, 2007;323.
Podcast CE: A Surgeon’s Perspective on Current Trends for the Management of Osteoarthritis, Part 1
May 17th 2024David L. Dycus, DVM, MS, CCRP, DACVS joins Adam Christman, DVM, MBA, to discuss a proactive approach to the diagnosis of osteoarthritis and the best tools for general practice.
Listen