Skin reconstruction techniques: Full-thickness mesh grafts
A mesh Graft is a full- or partial-thickness sheet of skin that has been fenestrated to allow drainage and expansion.
A mesh graft is a full- or partial-thickness sheet of skin that has been fenestrated to allow drainage and expansion.1-8 Full-thickness grafts consist of the epidermis and the entire dermis, while split-thickness grafts include the epidermis but only a portion of the dermis. Once fully vascularized and mature, full-thickness grafts may resemble normal skin in color, texture, and hair growth and are resistant to trauma.1
Mesh grafts are useful in many locations on the body because they conform to uneven surfaces. They can be placed in locations that have excessive motion because they can be sutured to the underlying wound bed. Additionally, their fenestrations provide outlets for fluid that may accumulate beneath the graft, which helps reduce tension and the risk of infection and improve vascularization of the graft.2,3 As granulation tissue grows up into the mesh openings, it further stabilizes the graft, and blood vessels can grow laterally from the plugs of granulation tissue into the dermis to enhance graft revascularization.6 Mesh grafting is especially useful in the distal limb where a minimal amount of tissue is available for local closure and in patients such as burn victims that have large defects and limited amounts of donor skin.1,3
How the graft takes hold
The survival of a mesh graft depends on early vascularization from the underlying tissue. Therefore, many veterinarians will wait seven to 10 days until a wound has a recipient bed of healthy granulation tissue before placing a graft. However, mesh grafts can be placed over any soft tissue that is vascular enough to produce granulation tissue. Nourishment of the graft initially depends on plasmatic imbibition—the uptake of serumlike fluid and cells into the dilated blood vessels of the graft by capillary action.6 Because hemoglobin products are absorbed at this time, the graft may appear cyanotic. Additionally, leakage of the absorbed fluid into the interstitial spaces results in edema. Circulation is reestablished about 48 to 72 hours after graft placement, but edema may persist or even increase until venous and lymphatic drainage are adequate.6 Anastomosis of graft and recipient vessels, known as inosculation, usually occurs 48 to 72 hours after graft placement. Only a few anastomosed vessels survive, but some of the graft vessels may proliferate and connect with the vascular bed. Eventually, vessels from the wound bed grow into the graft, growing at a rate of about 0.5 mm/day.6 Normal blood flow velocity is usually present by the fifth or sixth day after grafting, and lymphatic drainage is present by the fourth or fifth day.6
For revascularization to occur, the graft must adhere to the wound bed.6 Within the first 24 hours after surgery, a weak fibrin seal forms to give the graft some adherence to the wound.3,6 Over time, fibroblasts produce collagen to give the graft a firm attachment to the wound. The graft may contract initially; however, it usually returns to its original size between 10 and 21 days after placement.4 In the early stages of healing, granulation tissue grows and expands through the slits of the grafts.2 In some patients, the skin of maximally expanded grafts may remain pink after the wound heals, and hair growth may be sparse; however, expanded grafts are often indistinguishable from surrounding tissue because they contract and are covered by adjacent hair.6 Occasionally, the new hair growth on the graft will be a different color: In dogs, the new hair may be white, while in cats the hair may regrow several shades darker than at the donor site.3
Performing the graft
When choosing a donor site, consider the hair color, texture, and length and the skin thickness relative to the recipient site.3 Areas of loose skin, such as the lateral thoracic and abdominal walls make the best donor sites, because primary closure can be used, even if large grafts are harvested.1 Skin in these areas is relatively thin, which favors early revascularization. The neck is also a good donor site because of excess skin in the region.3 Skin from this area is relatively thick, however, especially on the dorsum of the neck, which could slow revascularization of the graft.6 Prepare the graft donor site by clipping and surgically scrubbing the area. Make sure to clip widely so that closure is not hindered by the surrounding hair.
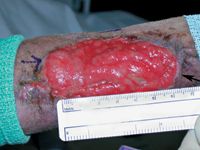
Figure 1. Granulation tissue with a new epithelial margin (black arrow) over the antebrachium ready for grafting. The arrow drawn on the skin with a sterile purple marker indicates the direction of hair growth.
If the graft bed is granulation tissue, remove the epithelium at the wound edge before making a pattern for the graft, because the wound often becomes larger after this procedure (Figure 1). 1 A punch biopsy of the graft bed can be submitted for culture; this will provide more accurate assessment of bacterial invasion than a simple swab. Cultures may be unnecessary if epithelium is advancing along the wound edge, since a granulation tissue bed that is healthy enough to support epithelium at its edge should be healthy enough to support a graft.6 Next, cover the prepared graft bed with moistened gauze to prevent the tissues from drying.3 If chronic granulation tissue is present, excise it and delay grafting for four or five days until a healthy granulation bed forms.6
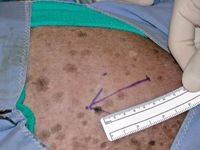
Figure 2. The donor site on the ventrolateral thorax. The arrow denotes the direction of hair growth.
The size of the graft depends on the amount of expansion desired. For unexpanded grafts, use an exact pattern of the wound to determine the size of the donor site. Because of the loss of length with an increase in width, cut an expanded graft about one-third longer than and half the width of the defect.3
To make a pattern of the wound, place a piece of sterile cloth or paper over the granulation tissue to obtain a blood imprint of the wound. Cut the pattern to the shape of the wound. Make sure to mark which side of the pattern faces away from the wound to avoid cutting a useless mirror image of the recipient site. When tracing the pattern on the donor site, ensure that it is oriented so that the hair growth of the grafted skin will be the same as that of the recipient site (Figure 2). 1,3
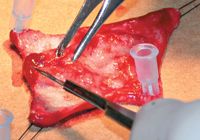
Figure 3. Removing the subcutaneous tissue. The graft is secured to sterile corrugated cardboard with hypodermic needles and stay sutures.
After the graft has been incised, gradually elevate it and roll it over your finger or a gauze role, or simply hold it in tension as you dissect all subcutaneous tissue away from the dermis.1 Alternatively, you can harvest the graft and then stretch it and secure it, epidermal side down, to a piece of sterile cardboard with stay sutures or hypodermic needles. Use sharp-sharp scissors or a scalpel blade to remove all subcutaneous tissue (Figure 3). Aggressive d衲idement can result in poor hair growth because of damage to the follicles. A properly prepared graft will have a white glistening surface with a cobblestone appearance as the hair follicles become visible through the dermis.1,6 Once the subcutaneous tissue has been removed, mesh the graft with a No. 11 scalpel blade. The size and number of slits depend on how much drainage and expansion are desired. The slits are often 1 cm long, placed 0.5 to 1 cm apart, and arranged along the length of the graft paralleling the direction of hair growth. Larger slits provide greater expansion but will result in a less cosmetic appearance than will smaller openings.
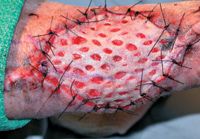
Figure 4. The graft is expanded and attached to the granulation bed with simple interrupted monofilament sutures.
The graft is usually attached to the donor site with sutures or staples (Figure 4). For all grafts, orient the direction of the hair growth with respect to the recipient site.3,6 To ensure that mesh slits remain open for drainage, secure the graft to one side of the wound with sutures or staples. If the mesh slits are open when the opposite graft and wound edge are apposed, place the remaining sutures or staples. If the mesh slits are not open, stretch the graft until the slits reach the desired width and excise the excess skin before completing the closure.6 Tacking sutures must be placed between some slits to further stabilize the graft (Figure 5). Tacking sutures are especially critical to obtain graft-wound contact on concave and convex areas of the wound.6
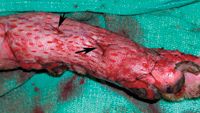
Figure 5. Tacking sutures (arrows) are placed around graft tissue and through fenestrations to increase graft-to-bed contact.
After a mesh graft is performed, bandages are essential to absorb drainage, immobilize the graft, and protect it from trauma. The contact layer should be a nonadherent dressing that is lightly coated with antibiotic ointment; too much ointment will make the pad occlusive to the draining fluid (Figure 6), resulting in maceration of graft tissue. A thick layer of absorbent secondary material should cover the contact layer to draw fluid away from the graft.6,8 The final layer of elastic or adhesive material is used to conform the primary and secondary layers of the bandage to the grafted area and prevent the bandage from slipping.6 Avoid excessive pressure because it can decrease the absorptive capacity of the bandage as well as decrease blood flow to the wound or distal regions.3 If the graft is near a joint, incorporate a splint or half cast in the bandage to immobilize the area.
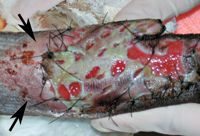
Figure 6. Maceration from excessive application of antibiotic cream (silver sulfadiazine). The skin proximal to the recipient site (arrows) has also been affected.
Healing process
The frequency of bandage changes depends on the amount of fluid produced. If the bandage becomes too wet, the skin may macerate, and bacteria may wick through the bandage to the wound.3 However, frequent rebandaging increases the risk of graft disruption. A weak fibrin seal forms within the first few hours after grafting but is gradually replaced by collagen.6 Daily or every-other-day rebandaging is usually required for the first five to seven days after surgery in dogs. Rebandaging should be done carefully, especially before the collagen fixation has had a chance to form, to prevent damage to the graft.3 After the first week, fluid production should decrease to a point where bandage changes are needed every three to five days. Splinting can be discontinued at 10 days if the graft has healed well, but bandaging is usually continued for three weeks after surgery. In cats, grafts heal quickly and drainage is less than that in dogs, so bandages may be changed less frequently and used for a shorter duration. The sutures are usually removed 10 to 14 days after grafting.

Figure 7. Three days after graft placement. Granulation tissue fills the mesh holes. The central portion of the graft appears necrotic.
Immediately after harvesting, grafts appear pale. For the next 48 hours, they may appear cyanotic, but color gradually improves as revascularization occurs, and the graft may take on a reddish hue (Figure 7). 6 By seven days you will be able to determine how much of the graft will survive (Figure 8), and by three weeks you can assess the cosmesis of the repair (Figures 9-11). Some grafts may have a partial-thickness take, with sloughing of the epidermis and upper part of the dermis, healing of the deeper dermis, and subsequent reepithelialization.6 These grafts will be functional but may lack good hair growth.

Figure 8. The graft shown in Figure 7 seven days after graft placement. A superficial layer of epidermis is sloughing. A small central portion of the graft has been lost because of either a lack of vascular tissue underlying the graft or poor graft-bed contact.
Complications
Three common factors cause graft loss. First, seroma or hematoma formation under a graft separates the graft from the wound and impairs revascularization. Second, infection produces exudation that also separates the graft and wound bed; additionally, the exudates contain enzymes that digest the fibrin bond that is weakly holding the graft in place, further impairing revascularization. Third, early movement of the graft breaks the tenuous bonds between the graft and bed and leaves space for fluid accumulation, damaging vessels and impairing vascular ingrowth.3,4,6 Meshing a graft helps avoid all three of these factors. It allows serum, blood, and exudates to drain for good graft-bed contact. Meshing also allows placement of tacking sutures to immobilize the graft without causing hematoma formation, since blood can drain through the mesh holes. In unexpanded grafts, this blood may clot in the mesh openings, impeding drainage.2

Figure 9. The graft shown in Figure 7 10 days after grafting. The sutures have been removed. The mesh holes have contracted, and the necrotic area has healthy granulation tissue.
Infection is uncommon if the original graft bed is healthy, proper sterile technique is maintained during surgery, and bandages are changed on a regular basis. If the graft begins to necrose, obtain a new punch biopsy sample, and submit it for culture to rule out infection.3 Abnormal hair regrowth is a minor complication that occurs when the bulbs of the hair follicles are traumatized during removal of subcutaneous fat or with inadequate revascularization from seroma or hematoma formation or excessive graft movement and subsequent necrosis of the epidermis and outer dermis.6 Although a minor complication overall, this abnormal hair growth may be the most important to owners and must be discussed with them.2

Figure 10. The graft shown in Figure 7 14 days after grafting. The mesh holes are barely visible, and the necrotic area has almost completely healed.
Conclusion
Mesh grafting is a relatively simple surgical procedure with valuable clinical applications. By taking adequate preparatory steps, performing careful measurements, and using atraumatic surgical techniques and attentive postoperative care, mesh grafting can be rewarding for clinicians and patients.

Figure 11. The graft shown in Figure 7 three weeks after grafting. Hair growth is evident.
Amanda Gibbs, BS
Karen M. Tobias, DVM, MS, DACVS
Department of Small Animal Clinical Sciences
College of Veterinary Medicine
The University of Tennessee
Knoxville, TN 37996-4544
REFERENCES
1. Pope, E.R.: Skin grafting in small animal surgery. Part II. Full-thickness skin grafting techniques. Compend. Cont. Ed. 10(9):1068-1076; 1988.
2. Swaim, S.F. et al.: Evaluation of a practical skin grafting technique. JAAHA 20(4):637-645; 1984.
3. Pope, E.R.: Mesh skin grafting. Vet. Clin. North Am. (Small. Anim. Pract.) 20(1):177-187; 1990.
4. Pope, E.R.: Effect of skin graft preparation and graft survival on the secondary contraction of full-thickness skin grafts in dogs. AJVR 46(12):2530-2535; 1985.
5. Bauer, M.S.; Pope, E.R.: The effects of skin graft thickness on graft viability and change in original graft area in dogs. Vet. Surg. 15(4):321-324; 1986.
6. Swaim, S.F.: Skin grafts. Textbook of Small Animal Surgery, 3rd Ed. (D. Slatter, ed.). W.B. Saunders, Philadelphia, Pa., 2003; pp 321-338.
7. Pavletic, M.M.: Free grafts. Atlas of Small Animal Reconstructive Surgery, 2nd Ed. W.B. Saunders, Philadelphia, Pa., 1999; pp 276-295.
8. Swaim, S.F.; Henderson, R.A.: Wounds on limbs. Small Animal Wound Management, 2nd Ed. Williams & Wilkins, Baltimore, Md., 1997; pp 295-370.