Vandalism turned learning tool
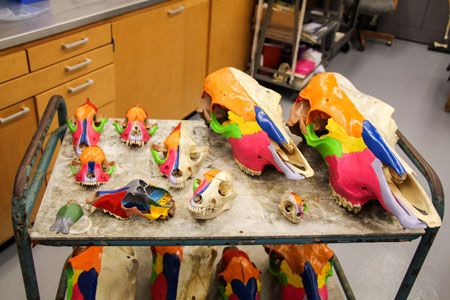
Anatomy students at the University of Illinois now have brightly painted skulls to help them learn difficult structures.

Photo courtesy of Irenka Carney | University of Illinois
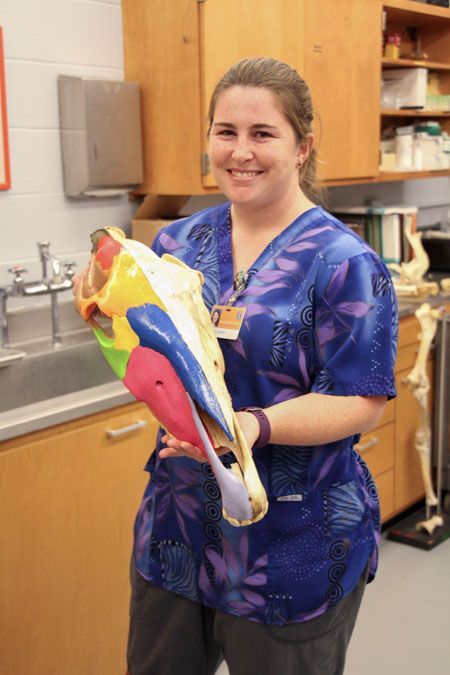
First year students at the University of Illinois College of Veterinary medicine are given a “bone box,” which contains the full skeleton of a small dog, to help them study the bones outside of their anatomy classes. At the end of the year, Ashley Lynch, an instructional laboratory specialist, collects the boxes and catalogs each bone and checks for damage. After coming across “I HATE ANATOMY” scrawled in ink on the right zygomatic arch of one of the skulls, Lynch had to come up with a way to cover the graffiti. The result: color-coded models that the students love.
When Lynch first found the graffiti, she tried several different solutions to remove the marks. “I tried taking the ink off with alcohol, pure acetone, and just about anything we could think of. Nothing took the marks off. The next step was to either stop using that skull or to paint over the marks,” she says.
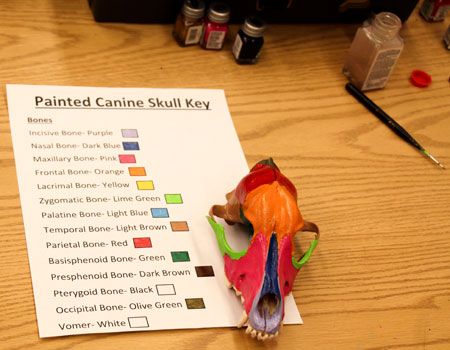
The words covered such a large area that Lynch says she didn't want the next student to have a skull that had a large part of the skull painted white. And it was in otherwise perfect condition. She then had an idea: She'd use model paint to paint the entire skull and delineate the boundaries of each feature, instead of only painting over the part that had been defaced. “Our students struggle to see the boundaries of the individual bones because the suture lines aren't as obvious in adult skulls,” she says. When the next round of students saw the skull, they loved it. “It was like a civil war in the lab over who got to look at the skull.”
From there, she painted the skulls of a horse and a cow. “This time instead of painting both sides of the skull, I only painted the individual bones of one half of the skull and then I painted circles around the different holes on the other side of the skull,” she says.

Photo courtesy of Irenka Carney | University of Illinois
Creating each masterpiece
From start to finish it takes a little more than a week to complete one skull. They process their own skulls at the university. First, Lynch removes as much tissue as she can from the head, which takes several hours. Then, the skull is placed in with the colony of flesh eating beetles kept for this purpose, and after about a week the beetles have removed any remaining tissue.
From there, Lynch coats each skull with three coats of polyurethane over the course of two days, to keep the skull from disintegrating over time. Then comes the colorful portion of the project, which takes between two and four days. “I find a skull that has minimal damage to it and I spend time outlining a specific bone in its assigned color and then fill it in with color,” she says. “Then I move on to the next bone. For example, the maxillary bone on every specimen I paint is a bright pink, whether it's a horse skull, cow skull, dog skull, or cat skull-every species with a maxillary bone has it painted pink,” Lynch says. “Once the right side of the skull is painted, I then go to the left side of the skull and draw circles in specific colors around each opening in the skull. Every fossa and foramen and fissure has its own assigned color.”

Photo courtesy of Irenka Carney | University of Illinois
Works that last
In the two years that the skulls have been in rotation, they've held up well with no damage being done to the skull or its paint job. And the students love them: “Students have come up to me and said they finally understood the skull after looking at the painted ones, or that the skull helped them figure out which foramen, fossa or fissure was which,” Lynch says.
Next year's students will have even more visuals to use as Lynch has also completed a set of canine forelimb bones. She plans to expand the collection to include a forelimb, hindlimb and vertebral column for each species that the students work with.