Leaky anesthesia machine? How to check the breathing system
Every veterinary anesthesia machine should be checked regularly for proper function. Heres how to evaluate your machines breathing system, which should be tested prior to every use.
Testing your anesthesia machine for leaks is necessary to ensure proper machine function while in use. This article discusses how to check the breathing system of a veterinary anesthesia machine. Separate articles explain how to check the pressure systems and scavenging system.
The breathing system contains all the parts required to deliver the anesthetic gas mixture to the patient. The components of the breathing system should be inspected visually before each use to ensure they are not damaged. Because it is the most common source of anesthesia machine leaks (see sidebar), performing a leak test on the breathing system prior to every use is absolutely imperative.
Common sources of leaks in rebreathing circuits
Loose connections on breathing hoses or attachment to machine
Kinked or damaged breathing hose creating a hole in the corrugated tubing
Hole in the reservoir bag (tears around the neck of the bag are most common)
Loose or cracked dome on either one-way valve
Improper placement of CO2 canister or canister gasket after changing absorbent
Worn rubber parts or gaskets on the CO2 canister
Debris present between rubber seal or gasket of CO2 canister
Assessing rebreathing circuits
Rebreathing circuits use breathing hoses that are attached to the inspiratory and expiratory one-way valves (unidirectional valves), pop-off valve (adjustable pressure-limiting valve), reservoir bag, manometer, air intake valve (not present on all machines) and CO2 absorbent canister. The most common type of rebreathing circuit used in veterinary medicine is the circle system, which is designed so that gases flow in only one direction. The breathing hose configuration can be either paired hoses that are joined with a Wye piece (Y-piece) or a coaxial design in which the inspiratory hose is located inside the expiratory hose (Universal F).
Steps to pressure check a circle rebreathing circuit (Wye dual-hose configuration).
Attach one breathing hose to the inspiratory one-way valve and the other to the expiratory one-way valve, and then attach the appropriate-size reservoir bag for the patient to the bag port. Alternatively, each component of the rebreathing circuit can be tested individually using the following steps:
- To test the components of the breathing system without the breathing hoses or reservoir bag, place a piece of scavenge tubing between the inspiratory and expiratory one-way valves and a plug on the bag port (Figure 1A).
- To assess the breathing hoses, attach a plug to the reservoir bag port (Figure 1B).
- To assess the reservoir bag, attach a piece of scavenge tubing between the inspiratory and expiratory one-way valves (Figure 1C).

Figure 1A. Testing components of the breathing system without the use of hoses or a reservoir bag. (Vetamac testing kit) (Photo courtesy of Michelle McConnell, LVT, VTS [Anesthesia & Analgesia])
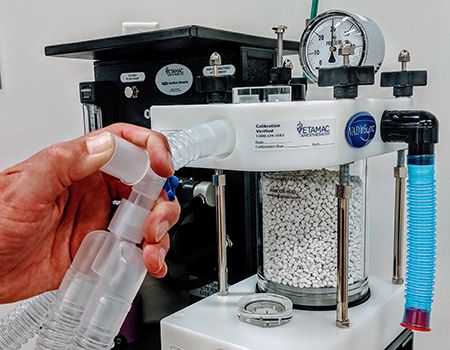
Figure 1B. Testing the breathing hoses with a plug at the reservoir bag port. (Vetamac testing kit) (Photo courtesy of Michelle McConnell, LVT, VTS [Anesthesia & Analgesia]
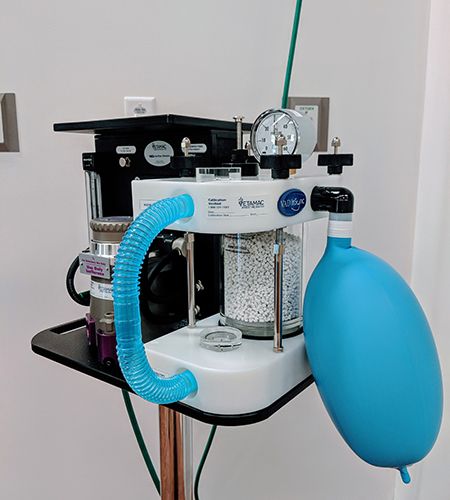
Figure 1C. Testing the reservoir bag with a plug at the inspiratory and expiratory one-way valves. (Vetamac testing kit) (Photo courtesy of Michelle McConnell, LVT, VTS [Anesthesia & Analgesia])
Close the pop-off valve and occlude the patient end of the circuit with your thumb or palm. Do not use a pop-off occlusion valve to perform a pressure check. These valves are designed to leak after a certain pressure so they may prevent a true assessment of a leak-free breathing system.
Fill the system with oxygen by turning on the flowmeter or pressing the oxygen flush valve until a pressure of 30 cm H2O is reached on the manometer. Once that pressure is reached, turn the flowmeter off. Do not use the oxygen flush valve if using the scavenge tubing noted in the alternate methods for step 1. The sudden high pressure could damage delicate internal components of the anesthesia machine.
If no leaks are present in the breathing system, the pressure should remain constant for at least 15 seconds (Figure 2).
- If the manometer indicator begins to fall, then a leak is present. To quantify the leak, turn on the flowmeter until the indicator stops moving. If an oxygen flow of 300 ml/min or less stops the leak, then the breathing system passes the leak test.1
- If the manometer indicator rises, a leak may be present in the flowmeter or oxygen flush valve. However, this test is not specific enough to indicate the precise location of such a leak.

Figure 2. Pressure check of a circle rebreathing system (Wye dual-hose configuration), with the manometer holding at 30 cm H2O. (Photo courtesy of Darci Palmer, BS, LVT, VTS [Anesthesia & Analgesia])
Open the pop-off valve slowly and observe the release of pressure from the reservoir bag. This ensures that the scavenging system and pop-off valve are working properly. Do not simply remove your hand from the patient port. A sudden drop in pressure could damage certain parts of the anesthesia machine. It can also cause absorbent dust to enter the breathing hoses and potentially come in contact with the patient's airway.
Assessing one-way (unidirectional) valves
The inspiratory and expiratory one-way valves work together to ensure that gases move in only one direction throughout the breathing system. They are composed of a round, lightweight material, often referred to as a disk, that is housed within a transparent dome so that you can see them moving. The one-way valves are placed on the anesthesia machine in either a horizontal or vertical position. Malfunction of these valves can lead to excessive rebreathing of CO2, which is detrimental to the patient when the anesthesia machine is in use. Therefore, competency of the one-way valves should be assessed before every use of the anesthesia machinery.
A variety of methods can be used to test the one-way valves, but I am most familiar with the pressure decline method, as described here.
How to assess the inspiratory one-way valve.
Place a leak-tested reservoir bag on the inspiratory one-way valve port.
Close the pop-off valve.
Occlude the reservoir bag port.
Inflate the bag to 30 cm H2O using the oxygen flush valve.
An intact inspiratory one-way valve will prevent gas flow back toward the machine. If no leak is present, the bag will remain inflated (Figure 3).
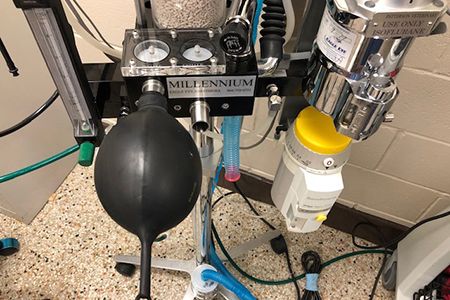
Figure 3. Assessing the integrity of the inspiratory one-way valve. The reservoir bag will remain inflated if no leak is present. (Photo courtesy of Darci Palmer, BS, LVT, VTS [Anesthesia & Analgesia])
How to assess the expiratory one-way valve.
Place a leak-tested reservoir bag on the reservoir bag port.
Close the pop-off valve.
Occlude the inspiratory one-way valve port.
Inflate the bag to 30 cm H2O using the oxygen flush valve.
An intact expiratory one-way valve should prevent gas flow out of the machine. If no leak is present, the bag should remain inflated (Figure 4).
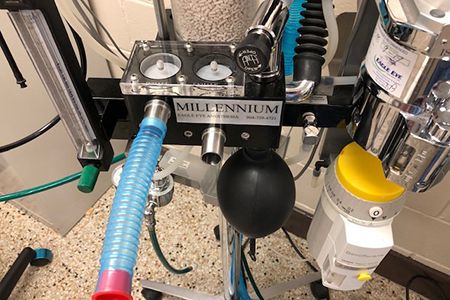
Figure 4. Assessing the integrity of the expiratory one-way valve. The reservoir bag will remain inflated if no leak is present. (Photo courtesy of Darci Palmer, BS, LVT, VTS [Anesthesia & Analgesia])
How to find a leak. While pressure checking the anesthesia machine, soapy water can help determine the source of a leak. Follow the flow of gas through the anesthesia machine and spray the soapy water in all locations that could be a source of a leak. If a leak is present, the soapy water will begin to bubble out of the machine (Figure 5).
A refrigerant leak detector (available from Amazon for less than $30) can be used to detect halogenated hydrocarbon vapor. This device will not quantify the concentration of inhalant or the parts per million, but it is more sensitive than a basic “sniff” test in exposing leaks that are present downstream from the vaporizer.
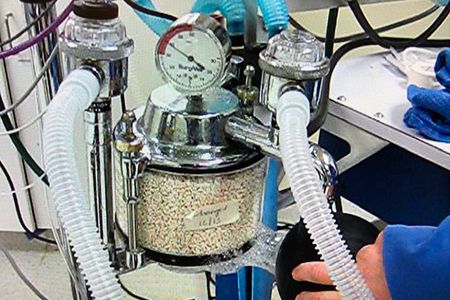
Figure 5. Soapy water sprayed on the CO2 absorbent canister produces bubbles, indicating a leak in the canister's rubber seal. (Photo courtesy of Darci Palmer, BS, LVT, VTS [Anesthesia & Analgesia])
Steps to pressure check a circle rebreathing circuit (universal F hose configuration). A Universal F has the inspiratory hose inside the expiratory hose (coaxial configuration), so only one hose connects to the patient but at the machine end the hose splits so that each hose connects to its corresponding one-way valve. Follow the same procedure outlined above for pressure checking a Wye dual-hose configuration. In addition, the inner tube should be tested in the same manner as the Bain coaxial circuit (see below).
Assessing non-rebreathing circuits
Non-rebreathing circuits are used commonly on smaller patients to help minimize resistance to breathing during spontaneous ventilation. These circuits do not use chemical absorbent for CO2 removal but instead depend on high fresh gas flow rates to flush the exhaled CO2-laden gas from the system. Because of this, the components of a non-rebreathing circuit are less complex. The two non-rebreathing circuits commonly used in veterinary medicine are the Bain coaxial and Jackson Rees circuits.
Pressure check for a non-rebreathing circuit (Bain coaxial using a Bain block). A Bain coaxial circuit is commonly used in conjunction with a Bain block that can be mounted on the anesthesia machine. This allows the circuit to use a reservoir bag port, manometer and pop-off valve.
Follow steps 2 through 5 outlined above for checking a rebreathing circuit. Note that even if the pressure remains constant there is no guarantee that the inner tube of the coaxial circuit is leak free. There are two methods to evaluate the inner tube: the occlusion test and the oxygen flush test.
Inner tube occlusion test.
Turn the flowmeter to 2 L/min and close the pop-off valve.
Occlude the inner tube at the patient end with a pencil eraser or syringe plunger for no more than 2 to 5 seconds.
If the float in the oxygen flowmeter drops, then the inner tube is leak free.
Depending on the inner tube diameter, occlusion may not be possible on all types of coaxial circuits. Careful inspection of the inner tube should be performed before every use to ensure it is attached properly at both the patient and machine ends. If the integrity of the inner tube is questionable, then the circuit should be discarded. Malfunction of the inner tube will greatly increase mechanical dead space that may result in significant rebreathing of CO2.
Oxygen flush test (Pethick test).
Close the pop-off valve and occlude the patient end of the circuit.
Using the flowmeter or oxygen flush valve, fill the reservoir bag completely.
Turn the flowmeter off and release the patient end of the circuit.
Activate the oxygen flush valve and observe the reservoir bag. The reservoir bag should deflate slightly (Venturi effect) if the inner tube is intact.
If the inner tube is detached from the machine end of the circuit, then the reservoir bag may inflate instead of deflate during this test.
Pressure check for a non-rebreathing circuit (Jackson Rees). The same procedure outlined above for the circle (Wye dual hose configuration) rebreathing circuit can be used to pressure check the Jackson Rees non-rebreathing circuit. The pop-off valve may be a button that is pressed on the reservoir bag or a valve that is moved between the open and closed positions. The standard Jackson Rees circuit does not use a manometer. Therefore, to pressure check this circuit, the reservoir bag should be overfilled for at least 15 to 30 seconds in order to observe the presence of any leaks. The pop-off valve should be opened to release the pressure in the circuit rather than removing your hand from the patient port. This will test the proper function of the pop-off valve. Disposable manometers (Figure 6) can be purchased and used on the Jackson Rees circuit. A manometer can be used in the same manner to pressure check the Jackson Rees circuit as it is with the other breathing circuits.
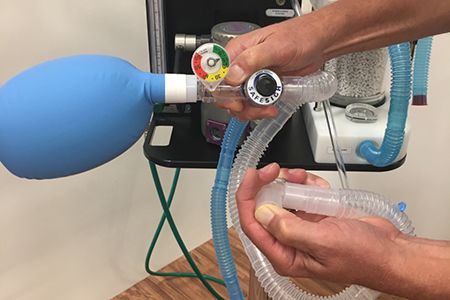
Figure 6. Disposable manometer on a Jackson Rees non-rebreathing circuit. (SafeSigh Manometer-Vetamac) (Photo courtesy of Michelle McConnell, LVT, VTS [Anesthesia & Analgesia])
Reference
Allen M, Smith L. Equipment checkout and maintenance. In Cooley KG, Johnson RA, Eds: Veterinary Anesthetic and Monitoring Equipment. Hoboken, NJ: John Wiley & Sons;2018:365-375.
Darci Palmer became a veterinary technician specialist in anesthesia and analgesia in 2006. She holds the executive secretary position for the Academy of Veterinary Technicians in Anesthesia and Analgesia. Darci is an instructor for the Veterinary Support Personnel Network (VSPN) and an administrator for the Facebook group Veterinary Anesthesia Nerds.
